

Principle & Practices, Project Management |
||
Website Designing and Hosting |
||
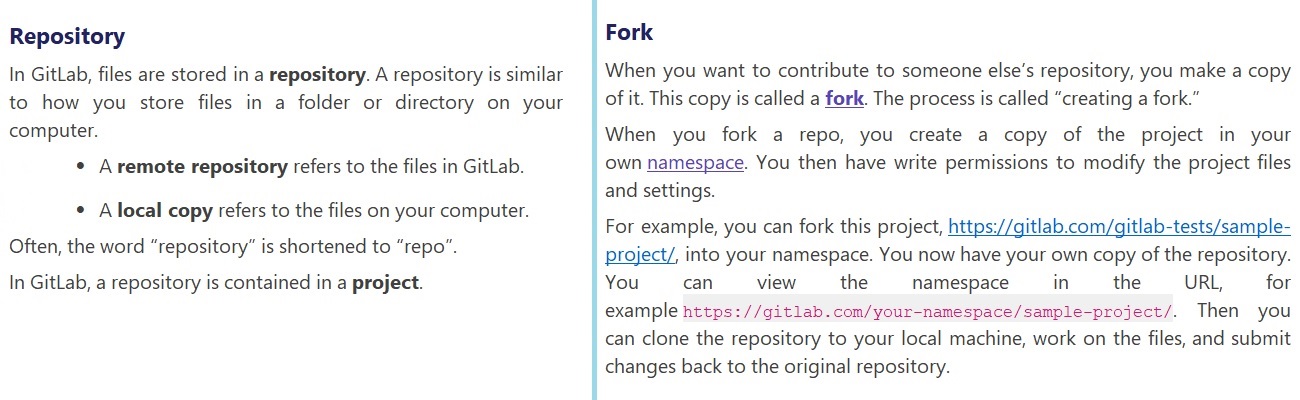
The objective for this introductory week is to plan and sketch a potential innovative idea for my final project which will be developed using all the skills I will learn in the coming weeks. So this week I worked on defining my final project idea and started to getting used to the documentation process. The class “How To Make (almost) Anything” (also “How To Make” or just “Make”) is sort of legendary. Each week we will cover a different fabrication technique by learning new tricks to make (almost) anything:
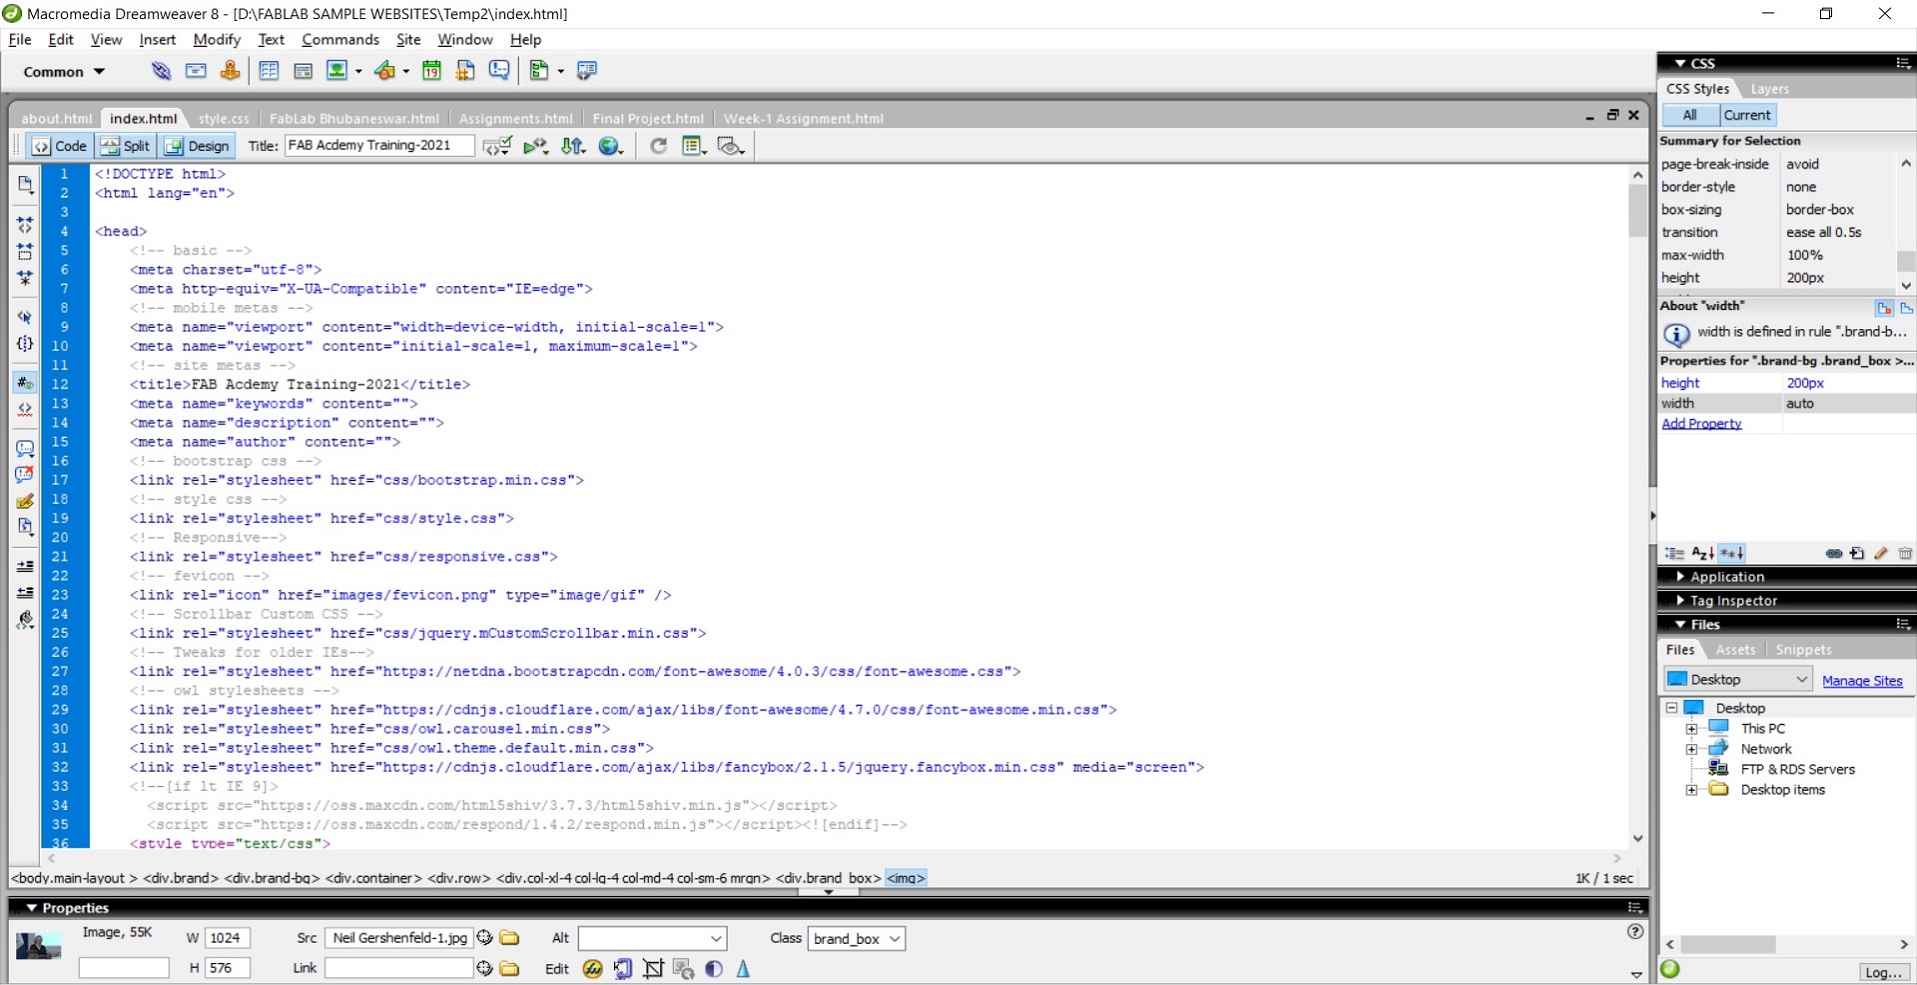
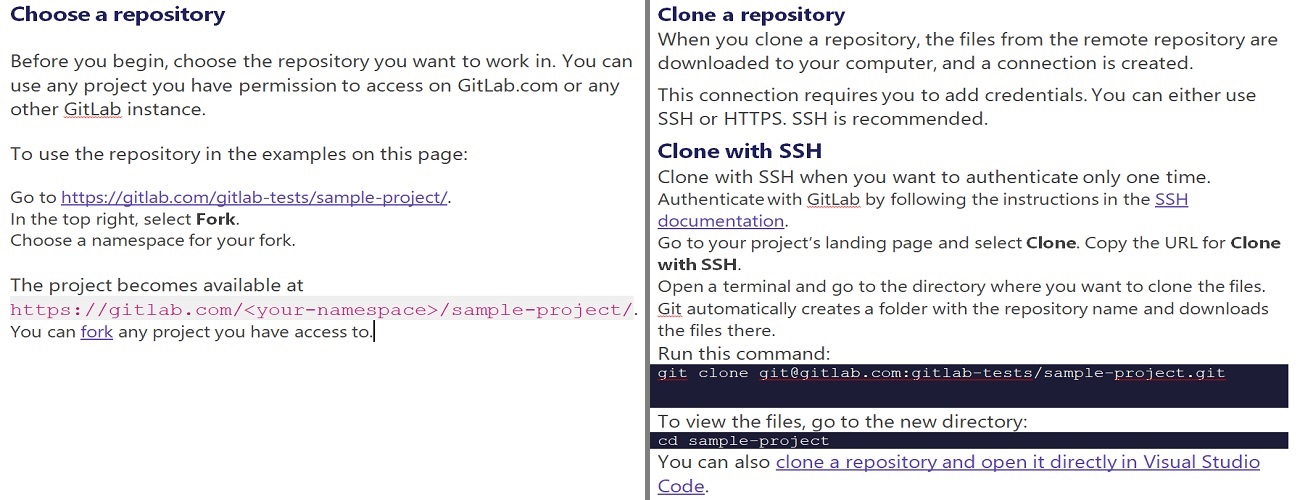
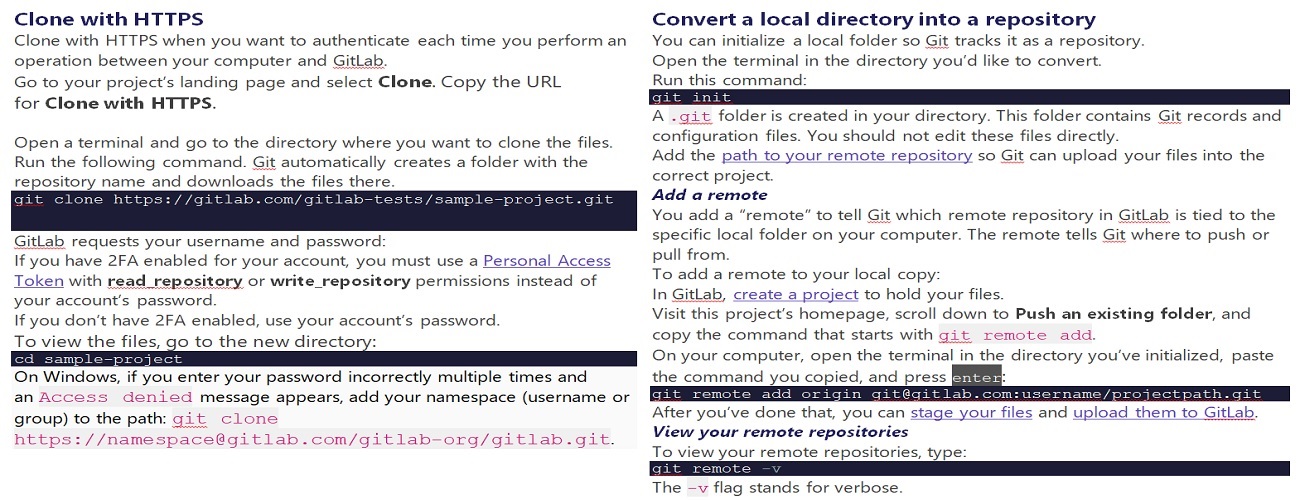
In the first week we learnt to design a website by using verious tools and to put the snapshots of the work done. The website also shows a brief idea of the project which is to be completed by the end of the training. The first week assignments was to create a website to use to document and share our ongoing Fab Academy progress and observations.After some research i found the best resources for information on HTML and CSS and developed my website by using Macromedia Dreamweaver 8.0. The main advantage of Dreamweaver 8 is that we can see the design as well as the HTML Code for the same in a single screen. For eg. the design of my initial page and its HTML code in a single screen is shown below:- |
||
About Dreamweaver |
||
Dreamweaver is a professional HTML editor for designing and managing Web sites and pages. It is a so-called WYSIWYG = What You See Is What You Get editor. This means that it enables direct visual edition of web pages. That feature permits edition of web pages without extensive knowledge of the html web code language. The code is automatically written by the editor. However it remains complicated to use for anyone who isn’t familiar with html. Dreamweaver is available for the macOS and Windows operating systems. Dreamweaver CC is a web design and an Integrated Development Environment (IDE) application that is used to develop and design websites. Dreamweaver includes a code editor that supports syntax highlighting, code completion, real-time syntax checking, and code introspection for generating code hints to assist the user in writing code.
Dreamweaver support for Web technologies such as CSS, JavaScript, and various server-side scripting languages and frameworks including ASP (ASP JavaScript, ASP VBScript, ASP.NET C#, ASP.NET VB), ColdFusion, Scriptlet and PHP. Dreamweaver, like other HTML editors, edits files locally then uploads them to the remote web server using FTP, SFTP, or WebDAV. |
||
This facility of Dreamweaver 8 provides the user options to either design the website using HTML code or by simply editing the text with auto generated HTML codes. Dreamweaver includes a site maintenance and file transfer capability. To use this feature to organize your site, create a local folder (e.g., on your desktop computer) to hold the site's files and then define your site. Make sure all files for a site are saved to the Local Root Folder or a subfolder thereof. That way you can easily create relative links in your documents and, when you're ready, publish the entire site to the equivalent location on the remote server. |
||
Overview |
||
Smart home automation using IoT is the ability to control domestic appliances by electronically controlled, internet-connected systems. It may include setting complex heating and lighting systems in advance and setting alarms and home security controls, all connected by a central hub and remote-controlled by a mobile app. “Home automation” refers to the automatic and electronic control of household features, activity, and appliances. In simple terms, it means you can easily control the utilities and features of your home via the Internet to make life more convenient and secure and even spend less. In this IoT home automation, I have planned to control the various devices like light, fan, TV, etc. A domestic automation system can monitor and/or manage home attributes adore lighting, humidity, temperature and appliances. It is very helpful to control your home devices. My proposed method has a small cost design, user flexible interface and simple installation in a house. Through IoT technology, the user can minimize the wastage of electrical power by proper monitoring and controlling.
The modern home automation system gives security and blissful life at residence. That is why the popularity of using home automation technology is increasing day by day. The proposed design and implementation of home automation, monitoring, and home security through the internet of things (IoT). The system focuses on the residence to make a smart wireless home automation which can control and monitor the house temperature, humidity, flame condition and all home devices from anywhere in the world. To update data our system takes just 3 seconds. As a result, a concern person can take necessary steps rapidly. This system can be controlled via many ways like the Internet, smartphone and electrical switch. Through IoT technology, the user can minimize the wastage of electrical power by proper monitoring and controlling. |
||
 |
||
Concept |
||
Smart home systems achieved great popularity in the last decades as they increase the comfort and quality of life. A smartphone application is used to control and monitor home functions using wireless communication techniques. We explore the concept of smart home with the integration of IoT services and cloud computing to it, by embedding intelligence into sensors and actuators, networking of smart things using the corresponding technology, facilitating interactions with smart things using cloud computing for easy access in different locations. The concept of Home Automation aims to bring the control of operating your everyday home electrical appliances to the tip of your finger, thus giving user affordable lighting solutions, better energy conservation with optimum use of energy. Apart from just lighting solutions, the concept also further extends to have an overall control over your home security as well as build a centralised home entertainment system and much more. The Internet of Things (or commonly referred to as IoT) based Home Automation system, as the name suggests aims to control all the devices of your smart home through internet protocols or cloud based computing. The IoT based Home Automation system offer a lot of flexibility over the wired systems s it comes with various advantages like ease-of-use, ease-of-installation, avoid complexity of running through wires or loose electrical connections, easy fault detection and triggering and above and all it even offers easy mobility. |
||
Block diagram & Flow Chart of the proposed system |
||
 |
||
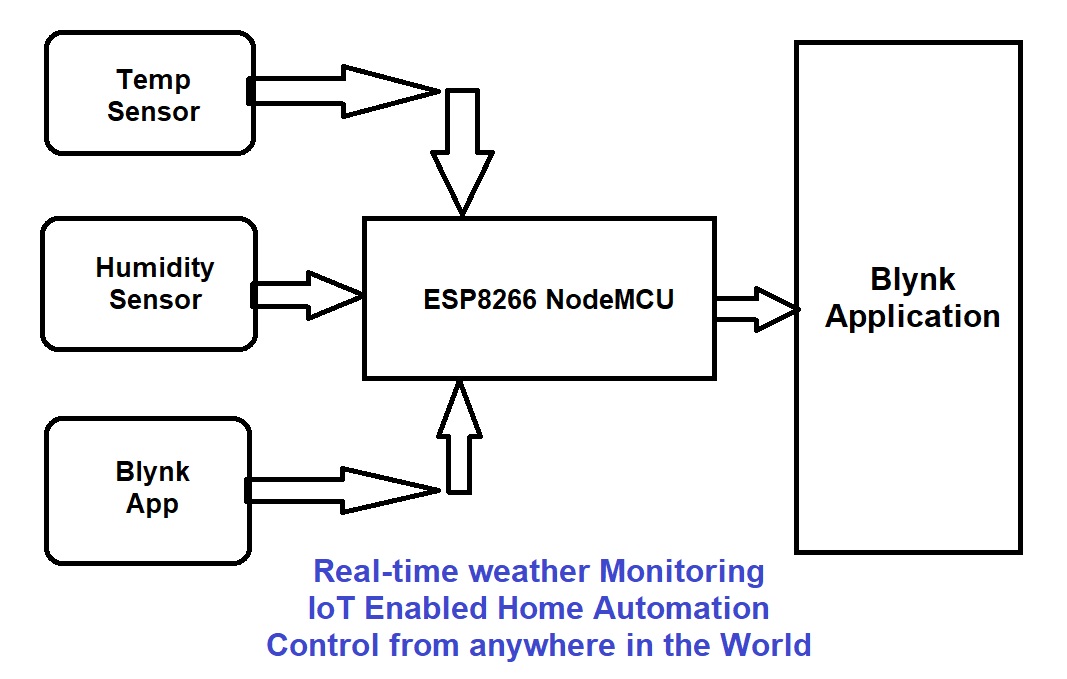
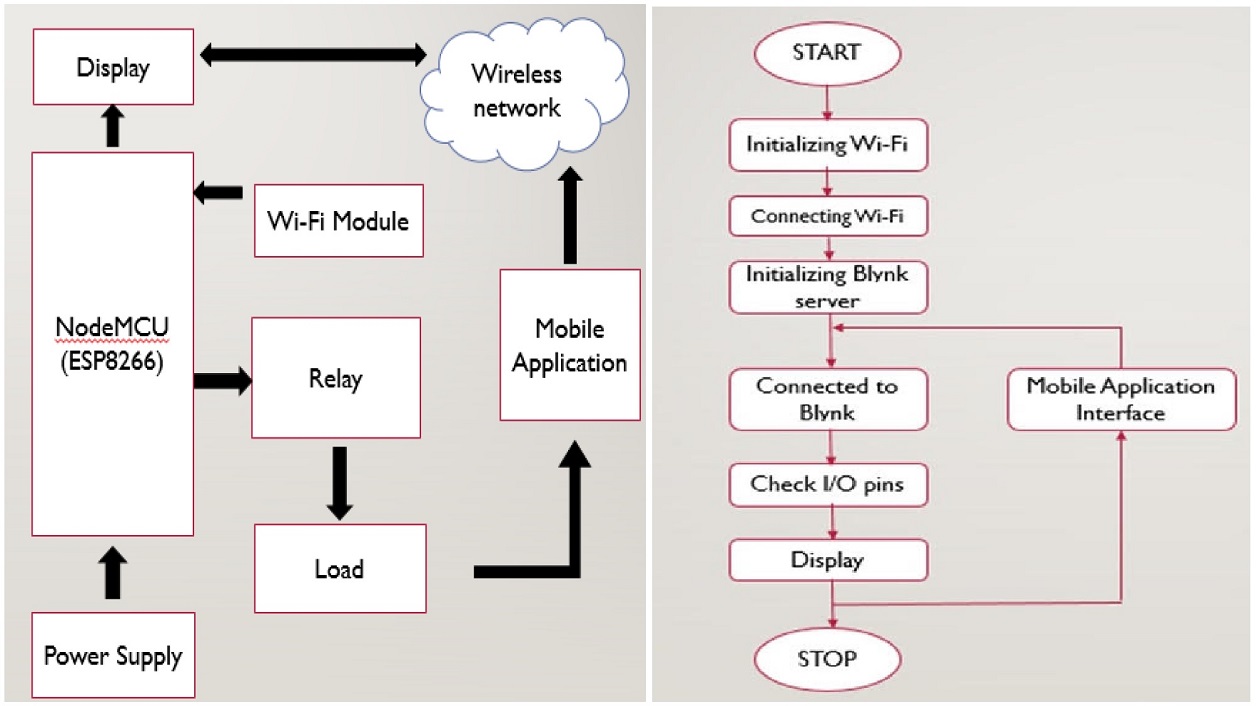
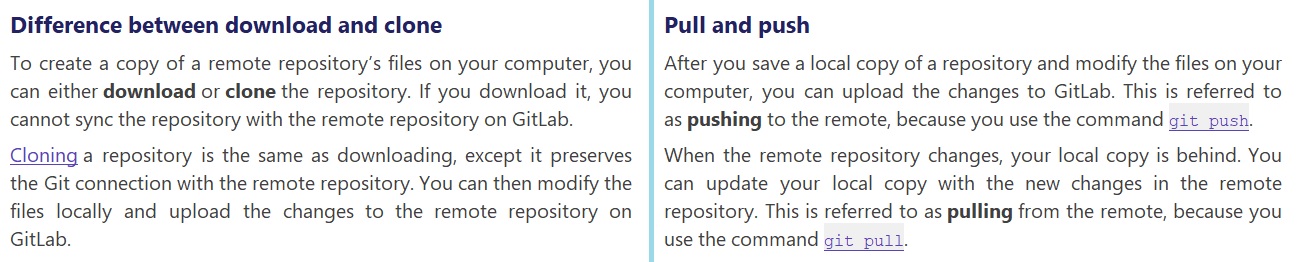
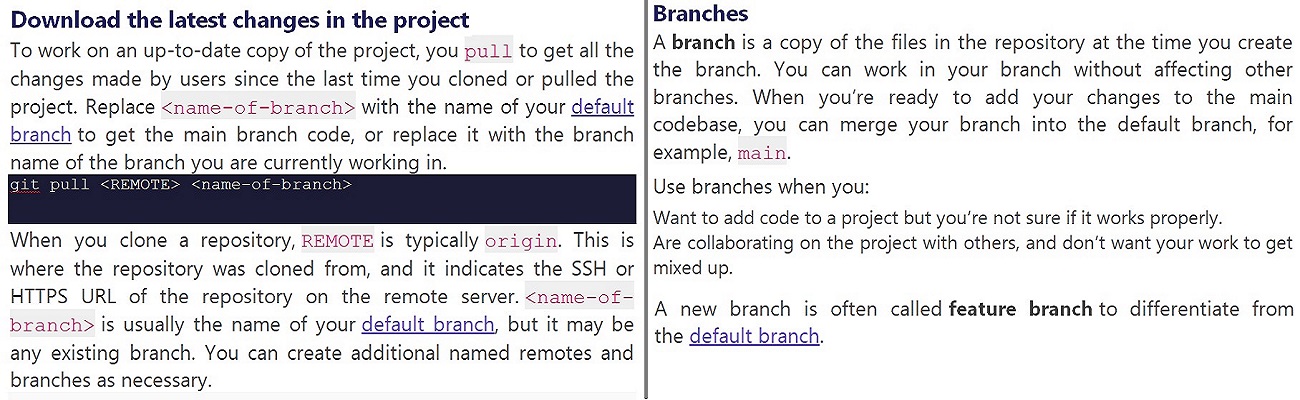
The block diagram gives the functionality of the overall project. The Node MCU unit is the microcontroller or the main controlling unit of the system. The user uses the mobile application in setting commands for functioning of the appliances. The mobile application interprets the command form in user in voice or switch mode and sends signal to the Node MCU unit, over a wireless network established by Wi-Fi communication. Hence the Wi-Fi module helps the microcontroller establish Wi-Fi communication with a device and take commands from an application over wireless network. The Node MCU on further receiving the signal then turns on/off the appliance with the help of relay. The Node MCU, relay and the final appliances are physically connected. There is a power supply unit that powers the microcontroller, the relay as well as the final appliances.
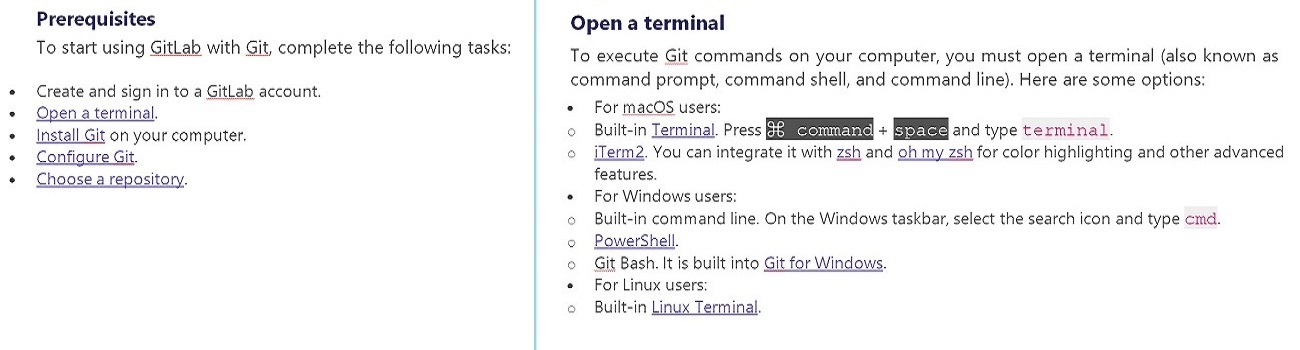
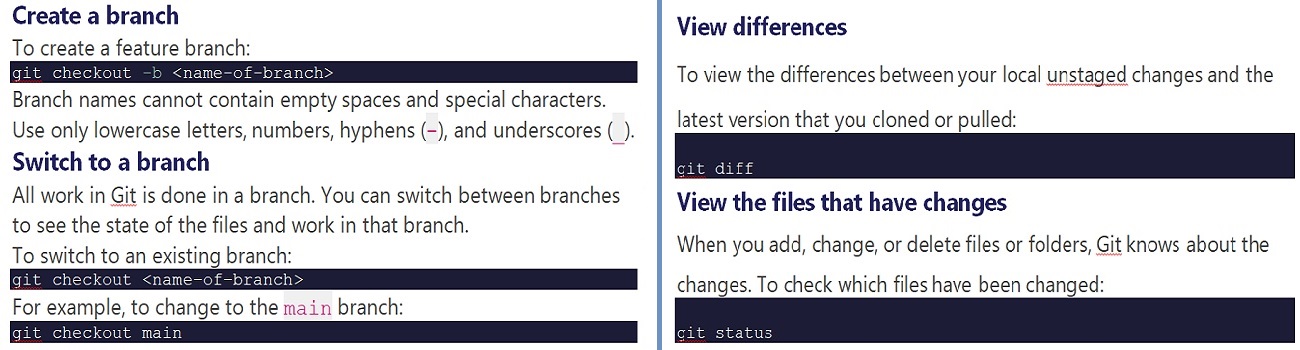
This flow chart shows the working of the project. The process starts be initializing the Wi-Fi, the network name and password are written in the code and uploaded to Node MCU. The android device is connected to Node MCU over Wi-Fi. The Blynk server is set up and connection is made, the devices is identified in the Blynk server using the generated authentication token. The command for controlling the load is given to the application, and this command, over Wi-Fi network is sent to the Node MCU. |